Ethernet & TCP/IP
Modern operating systems enable users to connect to computer networks via Ethernet or Wi-Fi, and the most widely used network is the Internet. On the Internet, some computers run web servers that host web pages, while others run web browsers that retrieve and display them. Communication between a web server and web browsers typically relies on TCP/IP. In this project, you will gain hands-on experience with the Intel Gigabit Ethernet Controller and learn how an operating system such as egos-2000 transmits and receives network packets. With Ethernet working, you will learn how to communicate using UDP, a component of TCP/IP. Lastly, we outline some open-ended possibilities for implementing a web server that uses the full TCP/IP protocol.
Creating a virtual network
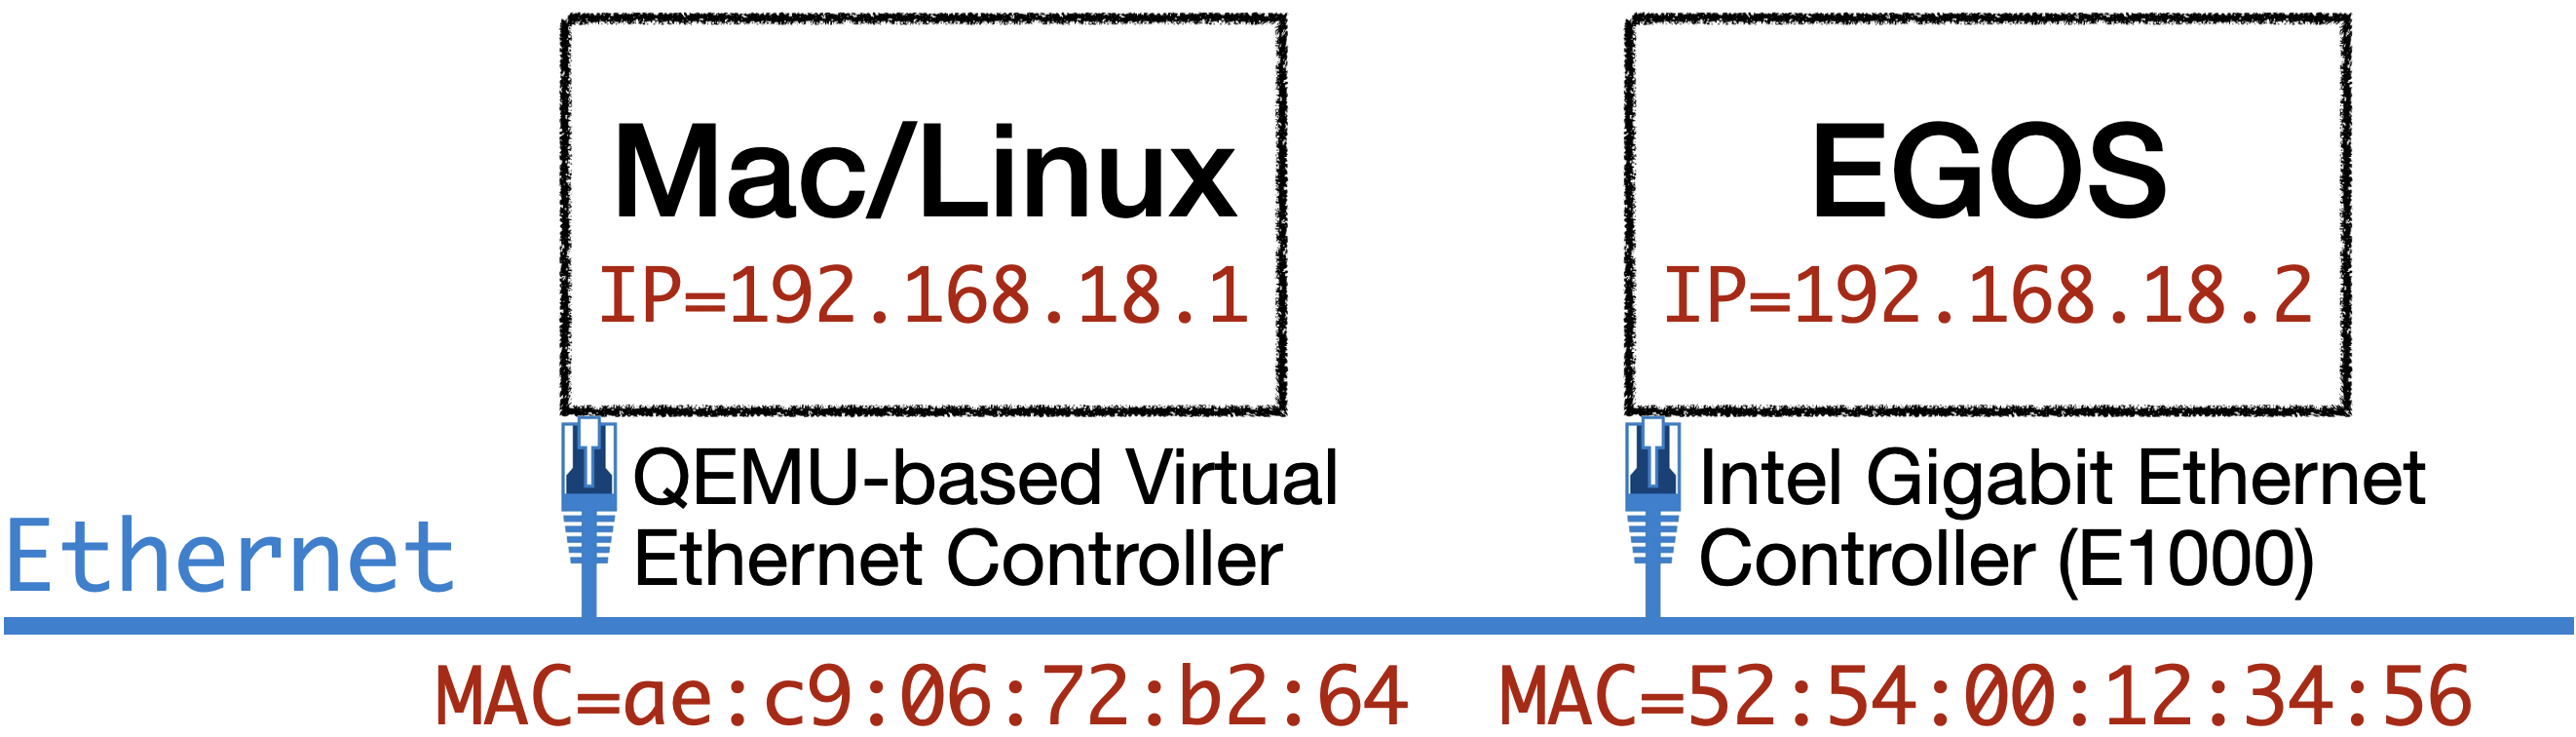
This project uses a simple network topology of two machines connected to Ethernet. The Mac/Linux box refers to your work machine on which you run QEMU. The EGOS box refers to the virt RISC-V machine emulated in QEMU that runs egos-2000. Your first task is to create an Ethernet network connecting the two. Instead of using Ethernet cables and routers, you will create an emulated network with QEMU-based software tools (i.e., a virtual network). After you finish this project, you can port your code to the Arty A7 boards with an actual physical Ethernet controller and an Ethernet slot (i.e., a LAN port).
Creating a virtual network involves different steps on macOS and Linux. We will explain the steps separately and cover the concepts of MAC and IP addresses.
MacOS
All you need to do is change one line in the Makefile while QEMU_ETHERNET_MACOS has been defined for you.
- $(QEMU) $(QEMU_MACHINE) $(QEMU_GRAPHIC) $(QEMU_FLASH_1) $(QEMU_SD_CARD)
+ sudo $(QEMU) $(QEMU_MACHINE) $(QEMU_GRAPHIC) $(QEMU_FLASH_1) $(QEMU_SD_CARD) $(QEMU_ETHERNET_MACOS)
MacOS provides the ifconfig command, which you can use to inspect the virtual network controller created by QEMU. Specifically, after you run make qemu and enter your sudo password, run the following command in a separate terminal.
> ifconfig -a
...
bridge100: flags=8a63<UP,BROADCAST,SMART,RUNNING,ALLMULTI,SIMPLEX,MULTICAST> mtu 1500
  options=3<RXCSUM,TXCSUM>
  ether ae:c9:06:72:b2:64
  inet 192.168.18.1 netmask 0xffffff00 broadcast 192.168.18.255
  inet6 fe80::acc9:6ff:fe72:b264%bridge100 prefixlen 64 scopeid 0x16
  inet6 fd64:5a7b:bd1e:741a:97:e7a7:bede:7f67 prefixlen 64 autoconf secured
  Configuration:
    id 0:0:0:0:0:0 priority 0 hellotime 0 fwddelay 0
    maxage 0 holdcnt 0 proto stp maxaddr 100 timeout 1200
    root id 0:0:0:0:0:0 priority 0 ifcost 0 port 0
    ipfilter disabled flags 0x0
  member: vmenet0 flags=3<LEARNING,DISCOVER>
          ifmaxaddr 0 port 21 priority 0 path cost 0
  nd6 options=201<PERFORMNUD,DAD>
  media: autoselect
status: activeThis is the virtual network controller device created by QEMU on macOS. If you quit QEMU, this virtual device will disappear. The two lines highlighted show the MAC and IP addresses. The MAC address is 6 bytes long and is shown in hexadecimal as ae:c9:06:72:b2:64. The ae is the lowest byte in this MAC address, and the 64 is the highest. An IP address has 32 bits, represented as 4 numbers in the range [0, 255]: the 192 is the highest byte, and the 1 is the lowest.
Linux (Ubuntu)
While QEMU creates a virtual network controller (i.e., bridge100) automatically on macOS, you need to create it manually on Linux. The steps below are taken from a student project targeting Ubuntu. You may need to search for more information yourself.
- Install
qemu-system, which gives you/usr/lib/qemu/qemu-bridge-helper. Note that it is used in the definition ofQEMU_ETHERNET_LINUXin the Makefile.net-toolsdownloads theifconfigcommand on Ubuntu.
> sudo apt-get install qemu-system net-tools- We will use
qemu-bridge-helperto communicate between egos-2000 and Ubuntu via thevirbr0bridge. The commands below createvirbr0for the bridge helper.
> sudo chmod u+s /usr/lib/qemu/qemu-bridge-helper
> mkdir /etc/qemu
> sudo chmod 755 /etc/qemu
> touch /etc/qemu/bridge.conf
> sudo chmod 644 /etc/qemu/bridge.conf
> echo "allow virbr0" | sudo tee -a /etc/qemu/bridge.conf
> sudo ip link add virbr0 type bridge
> sudo ip link set dev virbr0 up
> sudo ip addr add 192.168.18.1/24 dev virbr0- Inspect the virtual Ethernet controller
virbr0withifconfig.
> ifconfig -a
...
virbr0: flags=4099<UP,BROADCAST,MULTICAST>  mtu 1500
        inet 192.168.18.1  netmask 255.255.255.0  broadcast 0.0.0.0
        ether 52:54:00:9d:14:bd  txqueuelen 1000  (以太网)
        RX packets 9  bytes 468 (468.0 B)
        RX errors 0  dropped 0  overruns 0  frame 0
        TX packets 12  bytes 622 (622.0 B)
TX errors 0 dropped 0 overruns 0 carrier 0 collisions 0- Update the Makefile.
- $(QEMU) $(QEMU_MACHINE) $(QEMU_GRAPHIC) $(QEMU_FLASH_1) $(QEMU_SD_CARD)
+ sudo $(QEMU) $(QEMU_MACHINE) $(QEMU_GRAPHIC) $(QEMU_FLASH_1) $(QEMU_SD_CARD) $(QEMU_ETHERNET_LINUX)
The br=virbr0 in QEMU_ETHERNET_LINUX means QEMU will use this manually created virtual Ethernet controller, virbr0.
Mapping IP to MAC address
Take a look at the struct ethernet_header in apps/user/udp_demo.c.
struct ethernet_header {
    uchar destmac[6];
    uchar srcmac[6];
    ushort ethertype;
} __attribute__((packed));Suppose egos-2000 with MAC address 52:54:00:12:34:56 sends a 64-byte message to your macOS with MAC address ae:c9:06:72:b2:64. Here is what happens.
egos-2000 puts the 14-byte
struct ethernet_headerbefore the 64-byte message, and sets thedestmacandsrcmacasae:c9:06:72:b2:64and52:54:00:12:34:56.The 14+64=78 bytes are passed to the Ethernet controller (i.e., the E1000 network controller emulated by QEMU), which then broadcasts them over Ethernet.
The Ethernet controller on macOS named
bridge100receives 78-byte data and checks that the destination MAC address (destmac) matchesae:c9:06:72:b2:64. The macOS Ethernet controller thus knows that it is the destination for this 64-byte message.
If all we need is to communicate in the local Ethernet network, the steps above are enough. However, the Internet uses IP addresses to identify senders and receivers, where IP stands for the Internet Protocol. Many network tools rely on IP addresses, so macOS or Linux has to know how to map a machine's IP address to its MAC address.
# On macOS
> sudo arp -d -i bridge100 -a

# On Linux
> sudo arp -d -i virbr0 192.168.18.1
> sudo arp -d -i virbr0 192.168.18.2

# On both, and use virbr0 instead of bridge100 on Linux
> sudo arp -s 192.168.18.1 ae:c9:06:72:b2:64 -i bridge100
> sudo arp -s 192.168.18.2 52:54:00:12:34:56 -i bridge100
> sudo arp -a -i bridge100
? (192.168.18.1) at ae:c9:6:72:b2:64 on bridge100 ifscope permanent [bridge]
? (192.168.18.2) at 52:54:0:12:34:56 on bridge100 permanent [bridge]The arp command is built in for this purpose. The commands above tell your macOS or Linux system that, for messages sent to the IP address 192.168.18.2, 52:54:0:12:34:56 should be the destination MAC address in the Ethernet header. Similarly, the machine at IP address 192.168.18.1 has MAC address ae:c9:6:72:b2:64.
TIP
Make sure to carefully examine the output of sudo arp -a -i bridge100. If the mappings from IP to MAC addresses are incorrect or incomplete, network communication will likely fail.
Running the UDP demo app
Now is a good time to read the apps/user/udp_demo.c file. For example, you can find that struct ip_header holds src_ip and dst_ip, which are assigned by 192.168.18.2 and 192.168.18.1 in the main function. This demo app uses User Datagram Protocol (UDP) to send the string Hello from egos-2000!\n\r from egos-2000 (i.e., 192.168.18.2) to Linux or macOS (i.e., 192.168.18.1).
After creating a virtual network, your second task in this project is to modify the source and destination addresses at the start of this demo app, so it works on your machine. Again, you can use the ifconfig command to inspect the destination IP and MAC addresses. Press Ctrl+a c in QEMU to enter the QEMU shell, then type info network. The MAC address of the E1000 network controller is shown below.
> make qemu
...
[CRITICAL] Welcome to the egos-2000 shell!
➜ /home/yunhao QEMU 8.2.6 monitor - type 'help' for more information
(qemu) info network
e1000.0: index=0,type=nic,model=e1000,macaddr=52:54:00:12:34:56
 \ E1000: index=0,type=vmnet-host,
(qemu)After setting the addresses correctly in udp_demo.c, open two terminals and use the nc network tool to receive the UDP message on your macOS or Linux.
# In terminal #1
> make qemu
...
[CRITICAL] Welcome to the egos-2000 shell!
➜ /home/yunhao udp_demo

# In terminal #2
> nc -u -l 192.168.18.1 8002
Hello from egos-2000!In the nc command, -u means using UDP, and -l means listening. You can also use the tcpdump command. For example, right before running udp_demo in egos-2000, run sudo tcpdump -e -i bridge100 in another terminal. You should see the printing below with the addresses and the UDP, length 24.
> sudo tcpdump -e -i bridge100
14:57:27.269551 52:54:00:12:34:56 (oui Unknown) > ae:c9:06:72:b2:64 (oui Unknown), ethertype IPv4 (0x0800), length 66: 192.168.18.2.vcom-tunnel > 192.168.18.1.teradataordbms: UDP, length 24TIP
The bridge100 in the above commands refers to the virtual network controller interface shown in the output of ifconfig -a on macOS. Replace it with virbr0 when running on Linux.
Receiving data from Ethernet
After learning how to send a UDP message from egos-2000 through Ethernet, you will write the driver code for receiving messages. Specifically, when nc sends a UDP message from Linux or macOS to egos-2000, the Intel Gigabit Ethernet Controller will send an I/O interrupt to the Platform-Level Interrupt Controller (PLIC) component of the RISC-V CPU emulated in QEMU. Your driver code needs to enable interrupts from the Ethernet controller and handle them in the intr_entry function in grass/kernel.c, where timer interrupts are currently handled. When handling an I/O interrupt from Ethernet, you will print the metadata and data of the received Ethernet frame, in particular, the UDP message.
Enabling PLIC interrupts
Enabling I/O interrupts for the Intel Gigabit Ethernet Controller involves two steps. The first step is simply to set the MEIE bit of the mie CSR, just like setting mie.MTIE enables timer interrupts according to chapter 3.1.9 of the RISC-V Reference Manual. Just like the handling of timer interrupts, it allows the control flow to enter intr_entry with id==11 in the kernel upon an I/O interrupt (aka. external interrupt). However, this does not tell the kernel which device sends the I/O interrupt, and we need to learn that through PLIC and the concept of Interrupt Request (IRQ). Consider an IRQ as a number in the range [0, 1023], and PLIC associates a unique IRQ with each device.
The second step is to learn the IRQ number of the Ethernet controller and enable interrupts from this IRQ in PLIC. It is your job to figure out the details, but here are some hints.
#define PLIC_PRIORITY(irq)     (PLIC_BASE + 0x0000 + 4 * (irq))
#define PLIC_ENABLE_BASE(core) (PLIC_BASE + 0x2000 + 0x80 * (core))
#define PLIC_CAUSE(core) (PLIC_BASE + 0x200004 + 0x1000 * (core))The first macro sets the priority of an IRQ, and the second specifies the base address of a bitmap that controls whether an IRQ is enabled for a CPU core. Modify the QEMU_MACHINE in the Makefile and use -smp 1 instead of -smp 4 so that you only need to enable the interrupt for core #0. The third macro provides the device's IRQ number that triggered the interrupt, and you need it in intr_entry. In particular, make sure to read the IRQ number before handling an I/O interrupt from Ethernet and write it back after handling it. This allows PLIC to fire the next interrupt. Read chapter 10 of this CPU manual for more about PLIC.
TIP
Enabling and handling I/O interrupts for multiple CPU cores could be tricky. Focus on getting your Ethernet driver code working, and then you can work on supporting multicore in the next project.
Initializing the E1000 NIC
The key concepts in Intel's E1000 Ethernet controller are the receive descriptor and receive buffer. When E1000 receives an Ethernet frame, it writes the frame to a receive buffer and records its metadata (e.g., length) in the corresponding receive descriptor. On the operating system side, egos-2000 reads the descriptors and buffers, and sets the descriptors' status field to unused so they can receive future Ethernet frames.
In addition to the receive descriptors and buffers, you need to initialize a few other things for E1000, such as the MAC address and interrupt mask. Below is a list of the E1000 control registers you need to know; you can find more details in Intel's E1000 manual.
0xD0: Interrupt Mask Set/Read; 0x100: Receive Control
0x2808: Receive Descriptor Length
0x2810: Receive Descriptor Head; 0x2818: Receive Descriptor Tail
0x2800: Receive Descriptor Base Low; 0x2804: Receive Descriptor Base High
0x5400: Receive Address (MAC) Low; 0x5404: Receive Address (MAC) High
Add your code to initialize the E1000 device in earth/boot.c, and put the common data structures, such as the receive descriptor, in library/egos.h. Define an array of receive descriptors and an array of receive buffers as global variables in earth/boot.c. Declare them in library/egos.h, so the kernel can access them in intr_entry when printing out the UDP messages within the Ethernet frames received.
Printing the data received
Your last task in this project is to print the UDP messages received from Ethernet. Inspect the descriptor right after the Receive Descriptor Tail (i.e., 0x2818), and it should indicate that a frame has been received (i.e., bit #0 of the descriptor's status field is 1). Read the data from the corresponding receive buffer, and print out the buffer content at offset 42 (i.e., the size of the headers: 42==sizeof(struct ethernet_header eth)+sizeof(struct ip_header ip)+sizeof(struct udp_header udp) according to apps/user/udp_demo.c). Lastly, set the descriptor status field as unused, and advance the Receive Descriptor Tail.
Again, do not forget to write the IRQ back to PLIC, so PLIC can fire the next I/O interrupt. Do not forget to check your ARP records again, which should map IP address 192.168.18.2 to MAC address ae:c9:6:72:b2:64. After you finish, you should be able to do the following.
# In terminal #1
# You may need to add sudo before this nc command.
> nc -u 192.168.18.2 8002
Hello egos-2000!
This is Mac/Linux!

# In terminal #2
> make qemu
...
[CRITICAL] Welcome to the egos-2000 shell!
➜ /home/yunhao
[SUCCESS] Get 59 bytes from rxdesc[0] with UDP message "Hello egos-2000!"

[SUCCESS] Get 61 bytes from rxdesc[1] with UDP message "This is Mac/Linux!"The SUCCESS logs above show the Ethernet frame length, the receive descriptor index, and the UDP message at offset 42 of the receive buffer.
Write a web server with TCP/IP
After seeing how to send and receive Ethernet frames using UDP, you can start to research how to introduce more of TCP/IP. With TCP, you can write a simple web server listening on TCP port 80 and handling HTTP requests for HTML web pages. One way to do this is to integrate your Ethernet driver with the so-called uIP library, as explored by Professor Cheng Tan in his CS6640 at Northeastern University. This CS6640 student project is an open-source reference for this idea.
Another possibility is to run TCP over Wi-Fi, as demonstrated in the apps/user/tcp_demo.c file of egos-2000. It requires the Arty A7 board and the ESP32 Pmod extension. You can read the comments in apps/user/tcp_demo.c for more details. Note that the TCP/IP protocols are implemented in the ESP32 hardware, so you do not need a software driver such as the uIP library. However, this idea does not work on QEMU.
Accomplishments
You have gained experience with I/O interrupts, platform-level interrupt controller, and the IRQ numbers. You have also gained experience with the Intel Gigabit Ethernet Controller by reading Intel's manual and implementing the receive functionality. This concludes our introduction to device drivers in operating systems. We encourage you to research how to implement a TCP/IP web server on top of this project.